Tuesday, October 23, 2012

Pumpkin Patch!

So, with all the nesting projects and the crazy shuffle around here to wrap things up before the new baby comes, we thought we would have a fun family weekend with just the three of us before Sadie's big arrival.  We took Sophie to the pumpkin patch on Saturday. She had a blast! We enjoyed a hay bale ride, picking a pumpkin in the patch, admiring the goats, pigs, and ponies, and of course, playing in the corn pit! (Who knew!?) It was a bittersweet weekend for me.  It is always exciting to welcome a new member to the family, especially a little bitty one, but my pregnancy hormones get a tad emotional knowing with the new addition means dividing my time between my two children, which means they will grow up twice as fast! So it was fun to take one last advantage of just the one sweet girl and for just a weekend, spoil her a tad and for just one weekend feel as if I put time on pause.


-Amy-

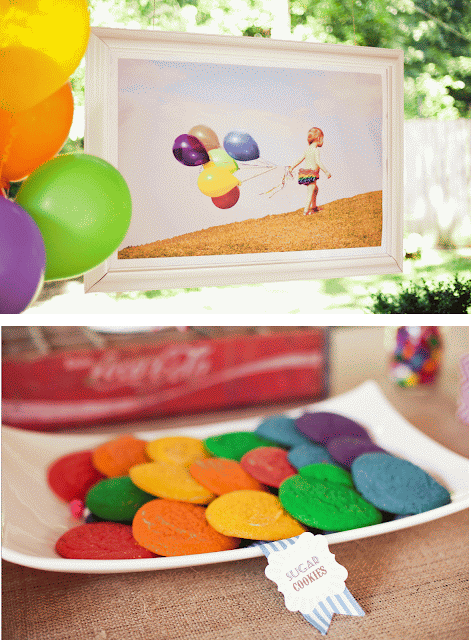
Up and Away! Sophie's Hot Air Balloon 2nd Birthday!

I am so psyched to share with you Sophie's 2nd birthday party! I had so much fun planning her party this year, from taking her picture for the invitations to making some of the food myself, no detail went unplanned. When working with a rainbow colored theme it is tricky trying to get that many colors to pop, but by grounding it against neutral whites and burlap the colorful collection had a successful pop! Enjoy!


Photographs were taken by my good friend, Amy at Amy Hough Photography


Happy Birthday, baby girl!


-Amy-


Wednesday, October 10, 2012

Cleaning Those Nasty Stove Top Burners

We tackled our last major project on my "to-do" list before baby arrives.  We spent all weekend showing our kitchen the much TLC it needed; from hanging new blinds and painting our hanging light fixture to scrubbing the refrigerator and stove top and oven. I really dreaded taking the kitchen on, (hence it being the last thing on our list to do) but our kitchen sparkles like never before! I have to share my new favorite trick with you!  I was a bit skeptical., but true enough it worked on my stove top burners' stubborn spills.

We inherited our stove and oven combo from the previous homeowners. The oven wasn't so bad, but the stove top had some caked on grease and cooking splatter all over the burners, drip pans, etc. I have scrubbed and soaked and scrubbed on these pieces and parts time and time again to find that nothing would remove. Our plan is to replace the stove at some point (hopefully soon), but for now, I couldn't imagine our new baby girl coming into a world where the stove is.... well, messy!

I found this idea on Pinterest and was a bit skeptical...


So then I checked out the blog post here and we gave it a try! I am so glad we did. I can testify that it works! Being preggo, I didn't actually mess with the ammonia  but my husband did.  He says he still had to slightly scrub while he rinsed them off at the end, but nothing physically taxing!

So, go ahead and give it a try! And let me know if you have as much success as I did!

-Amy-

Thursday, October 4, 2012

Maternity Picture/Family Picture Sneak Peek

I am so psyched to show you a sneak peek of our family photo/ maternity photo session that we had a few weeks back.  Our good friend, and a gifted photographer, Amy Hough of Amy Hough Photography took these. She has taken all of Sophie's pictures, birthday parties, family photos, and even some of my interiors! I was pleased once again with the job well done came out and cannot wait to see the rest!!


Thanks, Amy!!

--Amy--


Wednesday, October 3, 2012

Saying Goodbye to Our Guest Room

With the new addition to our family, I was in a dilemma about where to put her.  We live in a great house! It isn't big by any standards, but we live in a great neighborhood, with a wonderful backyard that backs up to a wooded area, which in the city, is hard to find. We have lived happily here for three years with our master bedroom, Sophie's bedroom, and a guest bedroom. When I began to plan for a nursery this summer, I wasn't sure where that nursery space should be.  Should I put the baby in with Sophie? Doing that would make for a tight squeeze in their room, and would elimate some storage for toys (which seem to accumulate every time I turn around!)  Plus, I felt like Sophie would be disturbed by me getting up with the baby during the night (Sophie started out week 1 sleeping in her crib, which I do not regret to this day.) My other thought was for the baby to share a room with our guests (not at the same time, of course!) But that room wasn't workable. A queen size bed and a crib definitely couldn't fit in the same room together, especially with any kind of changing area. So, that only left one option: transform my guest room into a nursery.

I snapped some photographs of our guest room before lovingly packing it away in storage.  It wasn't perfect by any means, but it was my favorite type of design: eclectic.  Each piece in the room had a story of when we purchased it and how we found it. I am not a photographer, so the lighting isn't the most flattering and in my opinion, the pictures don't do it justice.  But here it is, none the less...


As sad as it was to see that room go, I must admit, the newly renovated space is just as exciting! I cannot wait to show you pictures of the new nursery! It is almost complete and photo ready.  So stay tuned....


-Amy

Wednesday, September 26, 2012

Bookcase Styling Tips


I love client homes that have bookcases.  The design possibilities are endless! Styling a bookcase isn't always as easy as it seems.  In fact, it can be overwhelming and somewhat intimidating.  A well-styled bookcase can transform a room, often becoming the focal point, whether it be good or bad. House Beautiful and HGTV have provided us with some great design styling tips for bookcases. Check these out and then give yours a try!

1. Start with a clean slate.  Remove everything from the shelves, discarding any damaged books.

2. Decide on a backdrop.  The bookcase itself can serve as an excellent backdrop to showcase your masterpiece.  You can use paint, fabric, wallpaper, wrapping paper, etc.


pinterest.com


3. Decide to book or not to book. Do you want to use all books? No books? Some books? Experiment with different ways to stack them-- vertically or horizontally-- in a pleasing pattern. Horizontal books can even act as bookends.


4. Decide on the color of your books. Do you want to use books that are a certain color? Do you want to sort them by color? (You can always wrap unattractive book covers in a paper colors of your choice.)


ciaonewportbeach.blogspot.com


5. Personalize the space. Add a favorite collection, shapely vases, decorative boxes or baskets, and family photos. This helps keep your display visually interesting. You don't need to use all of these different items.  Just pick the ones that work for you.


houzz.com

6. Vary the heights of your objects. Nothing says boring like lining them up in a neat row.  The exception to this rule would be in a case where all books are used.  In that case, make it intentional! Have unity in the lined up books with commonality.  For instance, all books on each shelf are the same height, color, etc.  Or stack them horizontally from top to bottom and fill the shelves that way.

7. Use a few horizontally stacked books as a pedestal to highlight a particular object.


cianewportbeach.blogspot.com


8. Go big and bold.  Small items get lost and tend to send a knick-knacky feel.  Accessorizing anything with little knick-knacks is so out. A bookcase is a great place to show off that quirky horse head or abstract art piece that maybe you weren't bold enough to display alone.

9. Don't be afraid to mix in art work.

10. Add a little sparkle.  Glass and silver accessories are great options for adding this extra touch.  Propping a mirror as the backdrop can be another great option as well!

11. Don't over clutter.  Very important.  Keep in mind the open space around the objects.

Here are some of my favorite inspirations...


centsationalgirl.com


chinoseriechic.blogspot.com


Better Homes & Garden


dreamgreendiy.com


myuncommonsliceofsuburbia.com


Did you find anything inspiring? Let me know!

-Amy


Sunday, September 23, 2012

I'm Back/ Happy Fall... (Ya'll)

It's the most wonderful time of the year! (And yes, I am aware it isn't Christmas.) Fall time is my favorite season! It always excites me to see the stores starting to put out mums and pumpkins for sale. It is a sure sign that autumn is upon us.  And I don't know about you, but we are in desperate need of a change in season.  Our summer was long (and HOT!). There were definitely many highs to our summer, and unfortunately some lows. But I can tell you one thing for sure, this pregnant gal is sure glad the 100 degree days are gone! 

I am getting back in the groove of things, and hope to start posting regularly again. I cannot wait to share the many exciting things from our summer! We kicked off the summer with a fun, family vacation to Europe for three weeks, celebrated our little girl's 2nd birthday, celebrated the discovery of having another little girl, many nesting projects completed around the house, a few client installations completed, a fun 4D ultrasound visit revealing that our new little girl looks like my dad (go figure!), and finishing our new nursery while updating Sophie's room to a "big girl room". Whew! Things have been a little busy to say the least. 

Hope you all had a wonderful summer time! Good things are in store this fall! 


Monday, May 21, 2012

{TGIM} Giant Family Photos

Nothing makes me happier than seeing a picture of my sweet Sophie. In fact, I feel that way about all of my family photos.  There used to be a time (not long ago, btw) where designers frowned upon displaying one's personal family photos in their living rooms, family rooms, hallways, etc.. But that attitude is slowly shifting. There are emerging more and more great ideas (and creative ones!) on family photography.  This week I am featuring one of my nearest and dearly loved truly great ideas...


The photo featured came from Mary Schannen Photography.  This is in her home office.  I just love the gallery wall behind her desk!! Can you think of a perfect spot for such a display? Wanna get started? I found a great giant photo tutorial on-- where else? Pinterest! 

Have a photogenic week!

-Amy-


Friday, May 4, 2012

{TGIM} Faux Furniture

Another week, another Monday. I hope you all had a very Happy Mother's Day! I am so excited to present to you this week's truly great idea. In my opinion, it truly is a great idea; definitely one I am gonna have to try soon!

I love for a bed to look clean and crisp. We have an upholstered platform bed that we bought about 3 years ago. I wasn't sure how I would feel about having no bed skirt and tucking my bedding under the mattress and all. Well, I LOVE it! I love the clean lines it creates, as well as the modern look. This week's truly great idea offers a twist on a bedskirt: a faux bed! Sarah Richardson, a Canadian designer and television host, offered up the brilliant idea of putting furniture feet on a box springs and upholstering it!! YES! I said it. Take a look...


I love how both box springs look like a piece of furniture! The projects cost around $50 for fabric and feet. (Depending on how expensive the fabric, of course.) Furniture feet are available at most home project stores, such as The Home Depot or Lowe's. Sand them, prime them, and then paint them...


Here's the step-by-step to this cute little trick: (As told by Rachel of Urban Nest)


1.) Start with a long strip of fabric that will fit around the box spring (you will probably have to sew 2-3 pieces of fabric together to get the right length). To determine the width of the strip of  fabric, add 7 to 8 inches to the depth of the mattress. Finish the top and bottom edges with a zigzag stitch to prevent unraveling. Wrap the fabric around the box spring to determine the exact length and pin to mark where you'll sew the two ends together.

2.) After you have sewn the two ends together, stretch the fabric over the box spring leaving 4 inches to fold over the top of the box spring. Stitch the fabric to the top of the box spring to hold it in place. (You'll need to mitre the fabric at the corners.)

3.)Flip the box spring over and prepare to attach the fabric to the bottom side. In this case, I wanted to make sure the strips were level, and then I pinned it into place.

4.)  Staple the fabric to the bottom of the box spring, pulling it taut as you go.

5.) Trim the box spring padding to create a space to screw in the furniture foot. I attached 3 feet on each long side of the beds (6 total).

6.) Drill a hole that is slightly smaller than the width of the screw on the furniture foot.

7.) Cover the hole with the fabric, and use a pin to mark where the hole is.

8.) Cut a hole in the fabric for the screw to go through, and

9.) Screw in the foot.

10.) Repeat for the remaining 5 feet.  

Tip: If any of the feet are wobbly, remove the foot, squirt some wood glue in the hole, and reinsert the foot into the hole.

Happy Fauxing!!

-Amy-

Monday, April 23, 2012

TGIM is Back!! Customizing Roller Shades

So, after a long and whirlwind weekend, I am sharing this week's(and last's... and the one before that... and maybe the one before that...ok, so I haven't posted a Truly Great Idea Monday post in awhile, my apologies!) truly great idea brought to you straight from a blog I avidly read! I thought this was so cute, I had to pass it along! So, be inspired by this week's truly great idea...


Emily Clark as in emilyaclark.blogspt.com shared this great idea on her blog not long ago! Using a $5 roller shade, she completed this project for the guest bath/powder room. Want to create this cute idea? The details are here. The finished project looked like this...


She goes on to suggest using this idea for a window that you want to soften the look of, but not something where the shade need be necessarily functional.  The fabric caused the shade to be too thick to easily pull it up and down easily.
If you are needing a functional roller shade, but still want to dress it up, here are some great ideas...


Or, maybe add some ribbon trim...


Or, try painting the whole roller shade...


Or, how about a stencil that looks like fabric...


(And, I just found out that Lowe's sells a chevron stripe stencil!!)

And lastly, my favorite...


Dress up roller shades with trim and decorative pulls! Details here.

For a look divine!


Be inspired and create!! 

-Amy-